


Building a JavaScript project always gives an excellent overview of the internals of the language. And also, it helps to make the portfolio better. In today’s article, we will be building a fantastic mini JavaScript project. We aim to develop a Password Generator with pure HTML, CSS, and JavaScript. Even if you are thinking of moving to a certain framework like Angular, Vue, or React, learning core JavaScript concepts will significantly strengthen your base.
🖼 What Will We Learn?
- What is an ASCII Character table
- The
createElementmethod - Flooring a decimal value
- The
execCommandmethod
🥼 Writing the Markup

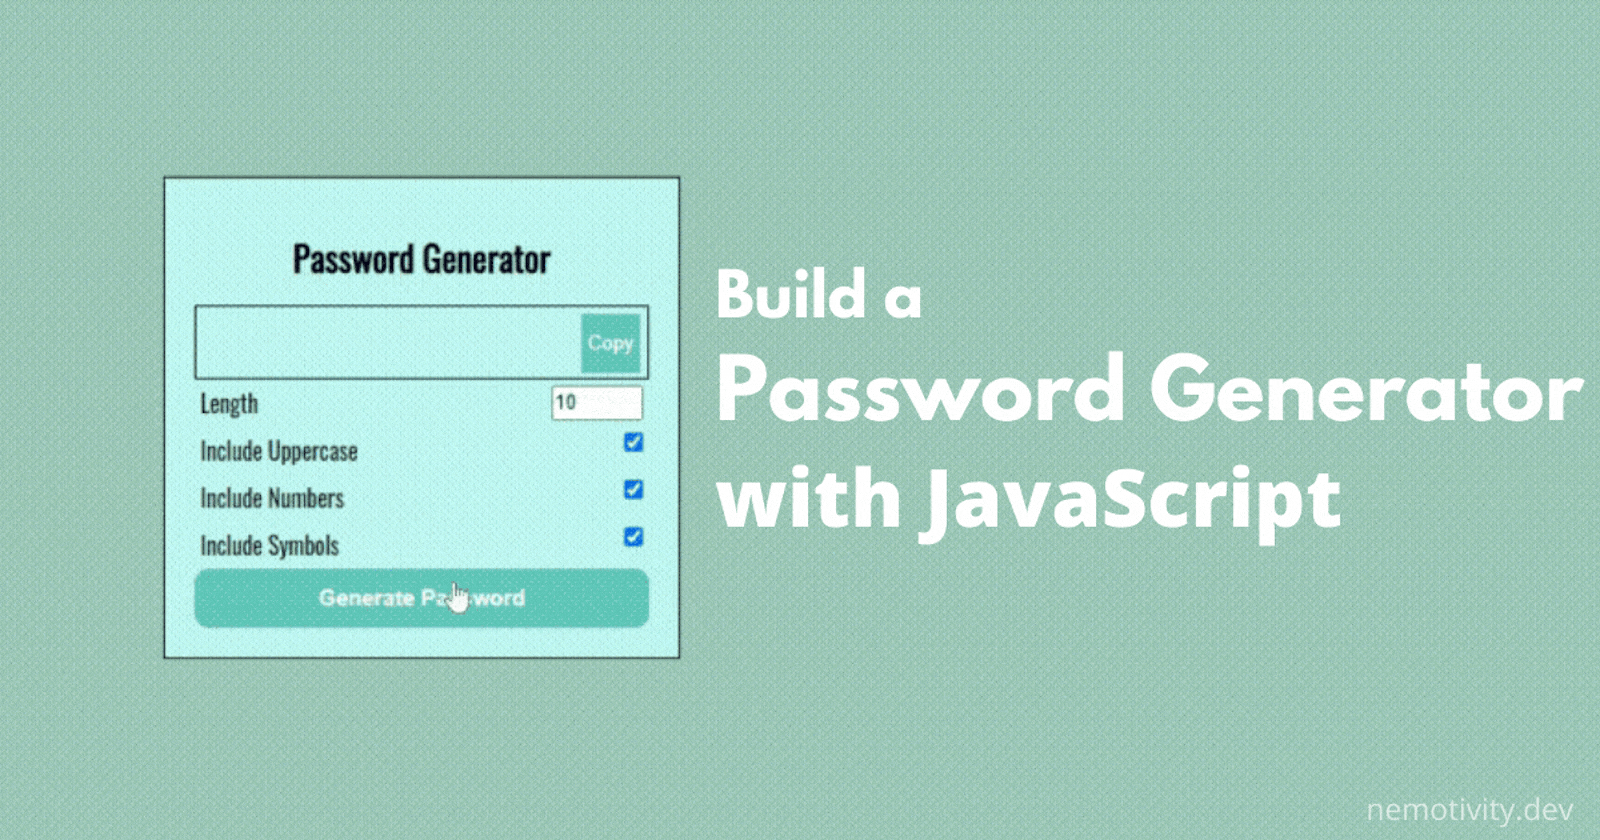
Before beginning to write any code, let’s first check the application itself. As you can see from the above GIF, the application has an area where the generated password is shown. It also contains a copy button that can be used to copy the password to the clipboard. Below that, we have a few options. The first one is a length property, which can be used to specify the password’s length. The next few options are to add or remove uppercase characters, numbers, or symbols. And finally, a button to generate the password. It seems easy, right? Now that we have a basic understanding of how we want to style our page we can start writing the page’s markup.
<!DOCTYPE html lang="en">

<head>
    <meta charset="UTF-8">
    <meta name="viewport" content="width=device-width, initial-scale=1.0">
    <link rel="stylesheet" href="./styles.css">
    <link rel="preconnect" href="https://fonts.gstatic.com">
    <link href="https://fonts.googleapis.com/css2?family=Oswald&display=swap" rel="stylesheet">
    <script src="./generator.js" defer></script>
    <title>Password Generator with JavaScript</title>
</head>

<body>
    <form id="passwordGeneratorForm">
        <div class="container">
            <h2>Password Generator</h2>
            <div class="result__container">
                <span id="result"></span>
                <button id="copy">Copy</button>
            </div>
            <div class="options">
                <div class="option">
                    <label>Length</label>
                    <input type="number" id="length" min="4" max="20" value="10">
                </div>
                <div class="option">
                    <label>Include Uppercase</label>
                    <input type="checkbox" id="uppercase" checked>
                </div>
                <div class="option">
                    <label>Include Numbers</label>
                    <input type="checkbox" id="numbers" checked>
                </div>
                <div class="option">
                    <label>Include Symbols</label>
                    <input type="checkbox" id="symbols" checked>
                </div>
            </div>
            <button class="btn" id="generate" type="submit">Generate Password</button>
        </div>
    </form>
</body>

</html>
As we can see, the markup is very straightforward. We are adding a google font to beautify the page. We are using the Oswald Google font. Other than that, we are linking our styles.css file and the JavaScript file that is named generator.js. The defer keyword in the script source makes sure that the JavaScript script is executed after the browser parses it.
Inside the bodytag, we are wrapping the complete password generator inside a form. We can also achieve the same functionalities using a div. But, we would use a form here. We are also giving a passwordGeneratorForm ID to the form. Inside the form, we are wrapping the whole block inside a divcalled container. A heading is also added. We are using H2here for the title. Now, for the place where we want to show the password, a result__container class is added. This result__container has two items. The first one is aspan with an ID of result, and the second one is a button with a text Copy in it. This button will be used as a copy to the clipboard button.
After closing the result__container div, we use a parent div of optionsto show the options. Each option inside the optionsclass is wrapped under a div of option.
The first option in our form is the password length. The inputtag in HTML is used for it. It’ll have a label of Length and an input type of number. An ID of lengthis also given to it for accessing it through JavaScript. Themin=”4” max=”20” value=”10” represents that the input will be of a minimum value of 4 and a maximum value of 20. The default value of the input will be 10.
The second option that we have in our app is to check if our password contains uppercase letters. Checking it will generate a password with uppercase characters. It has a label of Include Uppercase. The checkbox is an HTML input tag with a type of checkboxand an ID of uppercase. The checkedat the end of the input type means that by default, the box is checked. The include numbers and include symbols are the same as the include uppercase. All of these have different IDs according to their functionality.
Finally, after closing the options div, we add a button with a class btnand an ID of generate. The button will also have a type of submit. The button has a label of Generate Password. By clicking this button, the password will be generated. And we are done with the HTML.
Now we can move on to the CSS part. As you can see, the whole form is horizontally and vertically centered. This is achieved by using the CSS flexbox. If you are unfamiliar with CSS Flexbox, check the two-part CSS flexbox series.
✨ Styling the Document
The first thing that we do in every project is to clear the default formatting of the document. We will do the same here.
* {
  margin: 0;
  padding: 0;
  box-sizing: border-box;
}
The next thing is to specify the height and width of the body element. We will set the height and width to 100vh and 100vw. The vh and vw are the viewport height and width. The viewport height and viewport width resolve a percentage of the viewport. For example, 10vwwill set 10% of the current viewport width. So, the 100vh and 100vw will take 100% of the current viewport height and width. These units were introduced to CSS between 2011 and 2015. Because all the elements have to be centered vertically and horizontally, we will be using flexbox here. Also, we will add thefont-family property in the body. A background-colour is also specified here. The * is a global selector in CSS. The above styles will clear the default page style.
body {
  height: 100vh;
  width: 100vw;
  display: flex;
  align-items: center;
  justify-content: center;
  flex-direction: column;
  font-family: 'Oswald', sans-serif;
  background-color: #9dc5bb;
}
Now comes the container div section. This section has no complicated styling. It only has a padding property, a border property, a width property, and a background-color property. The 1rem represents 16 pixels by default.
.container {
  padding: 1rem 1.5rem;
  border: 1px solid black;
  width: 350px;
  background-color: #bcf4f5;
}
The Password Generator heading is the next element to style. It should be centered, so we go for the text-align: center property. The padding of the top and bottom is also added to make some room for the heading.
h2 {
  text-align: center;
  padding: 15px 0;
}
We have the optionclass in our document that wraps up the various options. We're going to be styling it next. Here the flexbox will also be used to space the checkbox and the label. There are also some paddings added here.
.option {
  display: flex;
  justify-content: space-between;
  padding: 4px;
}
Now, we will style the password box. The password box has a result__container div. A height and width will be given first to this box. Then we will use flexbox here to space the password area and the copy button.
.result__container {
  height: 50px;
  width: 100%;
  display: flex;
  justify-content: space-between;
  align-items: center;
  border: 1px solid black;
  padding: 0 5px;
}
The justify-content:space-between will push the elements to both ends. The align-items:center will center the elements on the cross-axis. A border and padding are also added to make proper spacing. The span where the password will be added will have only two properties. The first one is the word-wrap property. The word-wrap: reak-word will wrap the words inside the span. And a max-width property with the calc function is also added to adjust the maximum width. It is also fine if you don’t want to specify the max-width.
.result-container #result {
  word-wrap: break-word;
  max-width: calc(100% - 40px);
}
Now, we will be styling the copy button. The styling is very easy. I’ll just paste the styles below and you will get an understanding.
.result__container #copy {
  height: 40px;
  width: 40px;
  background-color: #5bc0be;
  color: #ffffff;
  border: none;
  cursor: pointer;
  outline: none;
}

.result__container #copy:hover {
  background-color: #1c2541;
  color: #ffffff;
}
We are specifying a height and width for the button. The cursor is changed to a pointer because we want to point that the button is clickable. The outline:none property will remove the border that is shown when the button is clicked. We are also setting the border to none. And, for the hover effect, we are changing the background color.
The only thing that is left now is the generate button. This is also similar to the above styles. We are just adding a border-radius extra here.
#generate {
  height: 40px;
  width: 100%;
  border-radius: 10px;
  border: none;
  background-color: #0b132b;
  color: #ffffff;
  font-size: 15px;
  font-weight: bold;
  cursor: pointer;
  outline: none;
}
#generate:hover {
  background-color: #5bc0be;
  color: #ffffff;
}
Now comes the tricky part - the JavaScript section. The JavaScript part is the heart of this app. All the interactivity is achieved using JavaScript. Let’s move on to JavaScript.
🎩 The JavaScript Part
Before writing the codes straight, let’s get an understanding of the ASCII character table. All the characters that we have on our keyboard have different codes assigned to them.
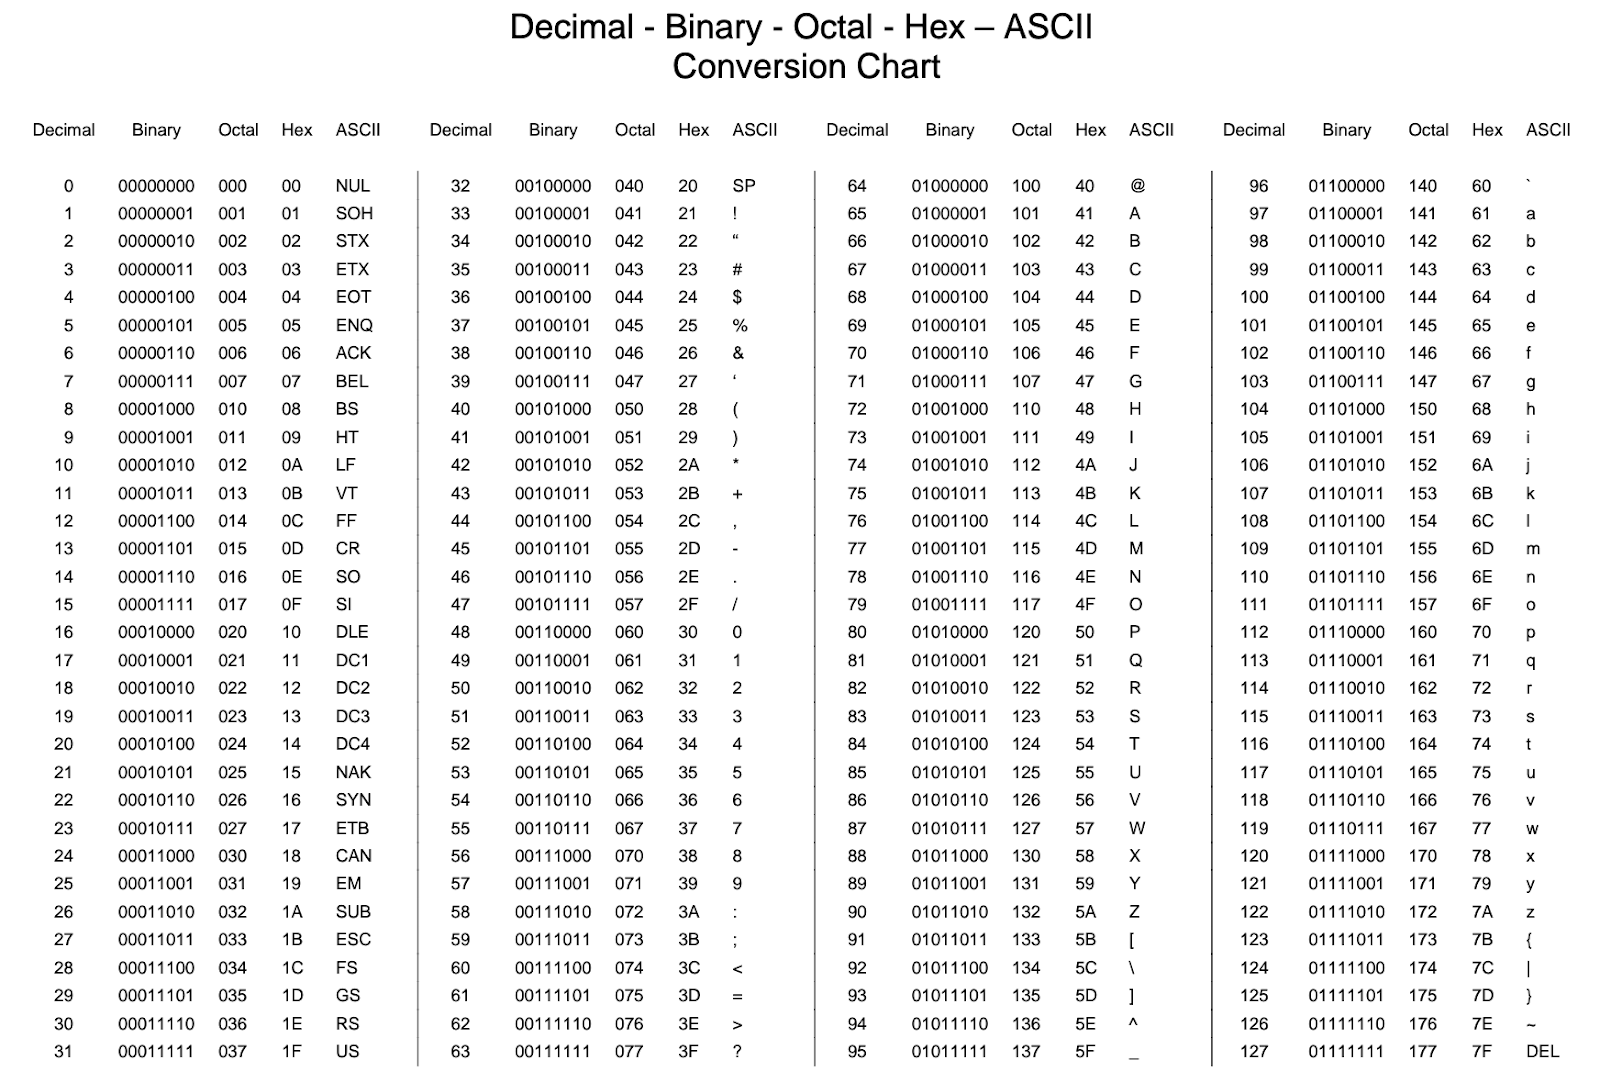
Image Source: bournetocode.com/projects/GCSE_Computing_Fu..
The codes are in different number systems. If you see the ASCII column in the above image, the uppercase ASCII A has a value of 65. And if you increase the values with one, we’ll eventually get all the 26 uppercase characters. Similarly, the lowercase starts at decimal 97 and keeps going up to 122. The decimal numbers start at 48 and end at 57. The symbols are at various places. We will use these decimal values to generate different password combinations. This might seem confusing until now, but we’ll eventually understand what we are going to do with these codes.
Let’s complete the tedious task first. Linking the different HTML elements in the JavaScript seems the most tedious task to me. However, it is one of the most important things to do. All our different options, buttons, and the password box have different IDs assigned to them. Let’s grab them using their IDs.
// Getting the DOM Eleements
const resultDOM = document.getElementById('result');
const copybtnDOM = document.getElementById('copy');
const lengthDOM = document.getElementById('length');
const uppercaseDOM = document.getElementById('uppercase');
const numbersDOM = document.getElementById('numbers');
const symbolsDOM = document.getElementById('symbols');
const generatebtn = document.getElementById('generate');
const form = document.getElementById('passwordGeneratorForm');
There is nothing much to explain here. So, we will jump to the next part.
As you have seen, all characters have a unique decimal value assigned to them. JavaScript has a particular method called fromCharCode. This method returns a string corresponding to the decimal value that we pass.
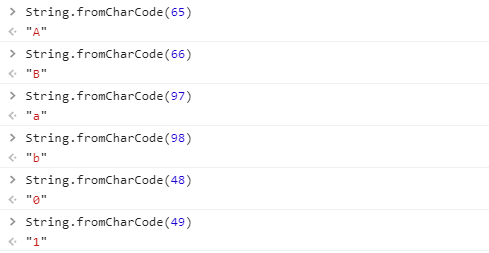
It is a static method of the String object, and for this, we always have to use the String.fromCharCode(value) syntax. So, now we have understood that we can generate the characters from codes. Now, we need such a function that will create all the characters. To achieve this, we’ll create a function that generates the decimal values of the characters. And in the end, we will convert all these values to characters using this method.
// Character Code Generating Function
let arrayFromLowToHigh = (low, high) => {
  const array = [];
  for (let i = low; i <= high; i++) {
    array.push(i);
  }
  return array;
};
This function will take two inputs, one for the smallest value and one for the highest value. It is an effortless function. It just increments until the highest value is achieved. All the incremented values are pushed to an array, and finally, the function returns the array.
This function can be used to generate decimal values of the characters.
// Generating Character Codes
const UPPERCASE_CODES = arrayFromLowToHigh(65, 90);
const LOWERCASE_CODES = arrayFromLowToHigh(97, 122);
const NUMBER_CODES = arrayFromLowToHigh(48, 57);
const SYMBOL_CODES = arrayFromLowToHigh(33, 47)
  .concat(arrayFromLowToHigh(58, 64))
  .concat(arrayFromLowToHigh(91, 96))
  .concat(arrayFromLowToHigh(123, 126));
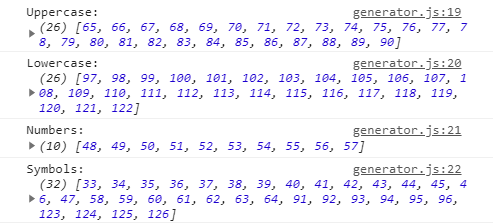
As you can see, for the uppercase codes, we are passing the low of 65 i.e, the value of uppercase A, and the high value of 90 i.e., the uppercase Z. Similarly, we are doing this for the lowecase characters and the numbers. Generating the character codes of the symbols are little different. Because they are distributed in the various corners of the table, we need to use the concat function to combine them into a single array. The symbols starts at 33 and increments up to 47 and then again continues at 58 and so on.
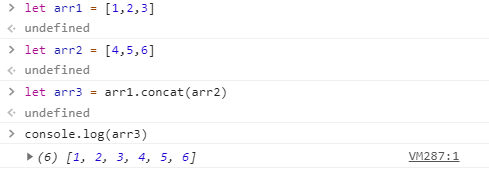
The concatmethod in JavaScript allows the concatenation of strings and arrays. Calling concaton a string or array and passing another string or array inside the concatfunction will concatenate the strings or arrays.
Syntax**:
str.concat(string2, string3, string4,......, stringN)
Where str is the base string, and the parameters are the strings that we want to concatenate. Here’s an example to help you understand the method better.
So, calling the arrayFromLowToHigh function with different ranges inside the concat method will create a complete array consisting of all the standard symbols’ decimal values.
// Generating Character Codes
const UPPERCASE_CODES = arrayFromLowToHigh(65, 90);
const LOWERCASE_CODES = arrayFromLowToHigh(97, 122);
const NUMBER_CODES = arrayFromLowToHigh(48, 57);
const SYMBOL_CODES = arrayFromLowToHigh(33, 47)
  .concat(arrayFromLowToHigh(58, 64))
  .concat(arrayFromLowToHigh(91, 96))
  .concat(arrayFromLowToHigh(123, 126));
By console logging all the arrays, you’ll be able to see that we have the arrays with decimal codes of the different characters.
We’ll be now moving on to making the Generate Password button working. We’ll target the button using the submit event listener. Until this point, if you click the button, you’ll find that the page is reloading. The first thing that we need to do is to disable this reloading behavior. JavaScript has a web API called preventDefault. The preventDefault method will make sure that the default behavior is not taken as it usually would be. To understand more about this method, I’d suggest you check this article.
// Checking the options that are selected and setting the password
form.addEventListener('submit', (e) => {
  e.preventDefault();
  const characterAmount = lengthDOM.value;
  const includeUppercase = uppercaseDOM.checked;
  const includeNumbers = numbersDOM.checked;
  const includeSymbols = symbolsDOM.checked;
  const password = generatePassword(
    characterAmount,
    includeUppercase,
    includeNumbers,
    includeSymbols
  );
  resultDOM.innerText = password;
});
In the above code, you can see that we are listening to the submit event. Getting the event, we are passing it to a function. We are using arrow functions here. The e is representing the event. Thee.preventDefault() is restricting the default behavior. Then, we are checking the multiple options. We can access the value inside the password length field by using the .value getter method that returns the input value. The .checkedgetter will return true if the checkboxes are selected. Otherwise, it’ll return false. The values that we are getting from the options are stored inside separate variables. We are also creating a variable called password. This variable will store the value returned by the generatePassword function that we’ll create soon. The generatePassword function takes four arguments because we have four options to select from. The arguments are the values stored by the variables that we declared above. Finally, with the innerText method’s help, we target the text inside resultDOM and change with the generated password.
The generatePassword function is the most crucial function here. Because the password that we are getting is generated using this function. We’ll be building this function now.
In the above code, we have seen that the generatePassword function takes four arguments. So, we also have to pass in the four parameters when creating the function. We will be using arrow functions again here.
let generatePassword = (
characterAmount,
includeUppercase,
includeNumbers,
includeSymbols
) => {
}
We want the password to be lowercase if no option is checked. Inside our function, we will create a variable that will store an array of the character codes. We’ll initially assign the lowercase character codes inside it.
let charCodes = LOWERCASE_CODES;
After that, we will check the options if they are true or not. We’ll use conditional statements for this.
  if (includeUppercase) charCodes = charCodes.concat(UPPERCASE_CODES);
  if (includeSymbols) charCodes = charCodes.concat(SYMBOL_CODES);
  if (includeNumbers) charCodes = charCodes.concat(NUMBER_CODES);
Depending on the options that are selected, we will concatenate the values to the charCodes variable. Now, for the password that will be generated, we create an empty array first. For this example, we will call it passwordCharacters. Then, we will create a loop that will loop until it reaches the number of characters we want. Inside the loop, we generate random character codes from the values that are available in the charCodesarray. And finally, we convert the characters from the character codes and push it into the passwordCharacters array. Let’s see the complete generatePassword function now.
// Password Generating Function
let generatePassword = (
  characterAmount,
  includeUppercase,
  includeNumbers,
  includeSymbols
) => {
  let charCodes = LOWERCASE_CODES;
  if (includeUppercase) charCodes = charCodes.concat(UPPERCASE_CODES);
  if (includeSymbols) charCodes = charCodes.concat(SYMBOL_CODES);
  if (includeNumbers) charCodes = charCodes.concat(NUMBER_CODES);
  const passwordCharacters = [];
  for (let i = 0; i < characterAmount; i++) {
    const characterCode =
      charCodes[Math.floor(Math.random() * charCodes.length)];
    passwordCharacters.push(String.fromCharCode(characterCode));
  }
  return passwordCharacters.join('');
};
So, we loop till the characterAmount that we are getting from the input field in our app. The charCodes variable has all the character codes depending on the options selected. We will then generate a random index position of the array using the Math.random() method. We are multiplying it with charCodes.length to restrict it to generate numbers up to the highest index position only. The Math.floor will round-off the number that is generated.
The String.fromCharCode(characterCode) will generate the string from the character code, and thepasswordCharacters.push() will finally push the character to the array. The return passwordCharacters.join(‘’) will convert the array to a string and return it.
And we are almost done. The only thing that is left is the copy to clipboard functionality. It may seem complicated, but actually, it is not. The copy to clipboard functionality can be achieved with just a few lines of JavaScript code. The simplest way to achieve it is by following the below steps.
- Create a
textareaelement - Set it’s
valueto the value we want to copy - Append the
textareato the HTML document - Select the value using the
select()method - Execute the
execCommand(‘copy’)method - Remove the
textarea
And we are done. Let’s see how we can integrate it within our code. We have a copybtnDOMbutton. We will listen to the click event on this element. When the event is triggered, we’ll execute a function. Inside the function, the first thing we will do is to create a textarea element. We can create HTML elements from JavaScript using the createElement method by passing the element we want to create.
const textarea = document.createElement('textarea');
We will create a variable now that will store the value that is to be copied. We can get the value using theresultDOM.innerText because the text inside the resultDOM holds our generated password.
const passwordToCopy = resultDOM.innerText;
If the passwordToCopy variable is empty, we will just return the function.
  // Edge Case when Password is Empty
  if (!passwordToCopy) return;
The next step is to set the textarea value with the value that we want to copy.
textarea.value = passwordToCopy;
Now, we will append it to the body of our document using the appendChild method. The appendChild method adds a node to the end of the list of children of a specified parent node.
document.body.appendChild(textarea);
So, the above code will create a children node of textarea inside the body parent.
To select the elements that we want to copy, we execute textarea.select(); method.
To copy the elements, we execute document.execCommand('copy'); method. The execCommand() method executes the specified command for the selected part of an editable section; for this app, the editable section is the textarea. The copycommand inside it will copy the values of the editable section.
After copying is done, we have to remove the textarea. It can be removed using textarea.remove();. And finally, to give the user a notification that the password is successfully copied, we will use a simple alert.
alert('Password Copied to Clipboard');
So, the final copy to clipboard functionality will look like this,
// Copy Password
copybtnDOM.addEventListener('click', () => {
  const textarea = document.createElement('textarea');
  const passwordToCopy = resultDOM.innerText;

  // Edge Case when Password is Empty
  if (!passwordToCopy) return;

  // Copy Functionality
  textarea.value = passwordToCopy;
  document.body.appendChild(textarea);
  textarea.select();
  document.execCommand('copy');
  textarea.remove();
  alert('Password Copied to Clipboard');
});
And we are done. We have successfully made our working password generator app. Finally, the complete JavaScript code looks like this,
// Getting the DOM Eleements
const resultDOM = document.getElementById('result');
const copybtnDOM = document.getElementById('copy');
const lengthDOM = document.getElementById('length');
const uppercaseDOM = document.getElementById('uppercase');
const numbersDOM = document.getElementById('numbers');
const symbolsDOM = document.getElementById('symbols');
const generatebtn = document.getElementById('generate');
const form = document.getElementById('passwordGeneratorForm');

// Generating Character Codes
const UPPERCASE_CODES = arrayFromLowToHigh(65, 90);
const LOWERCASE_CODES = arrayFromLowToHigh(97, 122);
const NUMBER_CODES = arrayFromLowToHigh(48, 57);
const SYMBOL_CODES = arrayFromLowToHigh(33, 47)
  .concat(arrayFromLowToHigh(58, 64))
  .concat(arrayFromLowToHigh(91, 96))
  .concat(arrayFromLowToHigh(123, 126));

// Copy Password
copybtnDOM.addEventListener('click', () => {
  const textarea = document.createElement('textarea');
  const passwordToCopy = resultDOM.innerText;

  // Edge Case when Password is Empty
  if (!passwordToCopy) return;

  // Copy Functionality
  textarea.value = passwordToCopy;
  document.body.appendChild(textarea);
  textarea.select();
  document.execCommand('copy');
  textarea.remove();
  alert('Password Copied to Clipboard');
});

// Checking the options that are selected and setting the password
form.addEventListener('submit', (e) => {
  e.preventDefault();
  const characterAmount = lengthDOM.value;
  const includeUppercase = uppercaseDOM.checked;
  const includeNumbers = numbersDOM.checked;
  const includeSymbols = symbolsDOM.checked;
  const password = generatePassword(
    characterAmount,
    includeUppercase,
    includeNumbers,
    includeSymbols
  );
  resultDOM.innerText = password;
});

// Password Generating Function
let generatePassword = (
  characterAmount,
  includeUppercase,
  includeNumbers,
  includeSymbols
) => {
  let charCodes = LOWERCASE_CODES;
  if (includeUppercase) charCodes = charCodes.concat(UPPERCASE_CODES);
  if (includeSymbols) charCodes = charCodes.concat(SYMBOL_CODES);
  if (includeNumbers) charCodes = charCodes.concat(NUMBER_CODES);
  const passwordCharacters = [];
  for (let i = 0; i < characterAmount; i++) {
    const characterCode =
      charCodes[Math.floor(Math.random() * charCodes.length)];
    passwordCharacters.push(String.fromCharCode(characterCode));
  }
  return passwordCharacters.join('');
};

// Character Code Generating Function
function arrayFromLowToHigh(low, high) {
  const array = [];
  for (let i = low; i <= high; i++) {
    array.push(i);
  }
  return array;
}
🧶 Conclusion
This app is just one way to generate passwords. Many other ways can be explored to achieve the same functionality. I hope you liked building our cool little password generator. If you have any doubt or suggestions, please comment below.
The complete code can also be found at this GitHub repo.